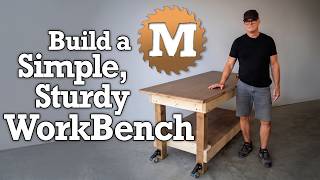
How to Build a Simple & Sturdy DIY Workbench | Step-by-Step
リアクション
2026年07月10日
Let's build a simple, sturdy workbench! In this video, I’ll show you step-by-step how to construct a rock-solid workbench using standard lumber and sheet goods. Whether you are a beginner DIYer or an experienced woodworker, this design is built to take a beating and last for decades.
Based on a classic design by Sandor Nagyszalanczy, I’ve updated the assembly process to use GRK screws and lag bolts instead of carriage bolts, making the build much faster without sacrificing any strength. Plus, I'll show you how to add a replaceable hardboard top and caster wheels to keep your shop mobile.
**Pro Tip:** Having your building supply store make the initial cuts on your heavy plywood and hardboard sheets will save you time and make transporting the materials much easier!
BLOG POST & PLAN LINK: https://manabouttools.com/workbench
SUBSCRIBE: https://www.youtube.com/c/MANaboutTOOLS?sub_confirmation=1
### 🛠️ Materials Needed
| **Lumber** | 2x6 Boards | Four 8-foot pieces (Aprons) |
| **Lumber** | 4x4 Boards | Two 8-foot pieces (Legs) |
| **Sheet Goods** | 1" Plywood | One 4x8 sheet (Top, Shelf, Brace) |
| **Sheet Goods** | 1/4" Hardboard | One 4x8 sheet (Masonite Top) |
| **Hardware** | Fasteners | GRK screws and Lag Bolts | https://amzn.to/4wA79d5
| **Hardware** | Wheels | Set of 4 Workbench Casters | https://amzn.to/4bDh1dU
| **Finishes** | Adhesives & Sealers | Wood glue, 5-minute epoxy, Polyurethane |
### 🧰 Tools Used in This Build
* Miter Saw (or Circular Saw with a straight edge) https://amzn.to/4bDh1dU
* Speed Square & Measuring Tape https://amzn.to/4fsOuds
* Drill / Driver https://amzn.to/3R6GoxS
* Orbital Sander (with 120 and 220 grit paper) https://amzn.to/3R8P7zp
* Quick Grip Clamps & C-Clamps https://amzn.to/4pdXYwz
* Stapler (optional, for the lower shelf hardboard) https://amzn.to/4grTZKp
### 📋 Video Highlights & Build Steps
1. **Cutting the Lumber:** Breaking down the 4x4 legs and 2x6 aprons.
2. **Frame Assembly:** Building the long sides first, then connecting them with the short aprons using glue and heavy-duty lag screws.
3. **Adding the Top:** Creating cleats and attaching the 1" plywood top securely to the frame.
4. **Shelf & Casters:** Fitting the lower plywood shelf and installing caster wheels for maximum shop mobility.
5. **The Hardboard Surface:** Gluing and clamping the replaceable 1/4" masonite top to the upper plywood, and stapling the lower shelf surface.
6. **Finishing Touches:** Sanding the edges and applying a protective coat of polyurethane.
If you enjoyed this build and want to see more woodworking projects, be sure to hit that subscribe button. See ya next time!
#DIYWorkbench
#Woodworking
#WorkbenchBuild
#ShopProjects
#DIY
DISCLAIMERS:
Some of these links have an affiliate code, if you purchase tools with these links I will receive a small commission at no additional cost to you. Thank you! The tools or equipment seen in this video and have been purchased ourselves.
Based on a classic design by Sandor Nagyszalanczy, I’ve updated the assembly process to use GRK screws and lag bolts instead of carriage bolts, making the build much faster without sacrificing any strength. Plus, I'll show you how to add a replaceable hardboard top and caster wheels to keep your shop mobile.
**Pro Tip:** Having your building supply store make the initial cuts on your heavy plywood and hardboard sheets will save you time and make transporting the materials much easier!
BLOG POST & PLAN LINK: https://manabouttools.com/workbench
SUBSCRIBE: https://www.youtube.com/c/MANaboutTOOLS?sub_confirmation=1
### 🛠️ Materials Needed
| **Lumber** | 2x6 Boards | Four 8-foot pieces (Aprons) |
| **Lumber** | 4x4 Boards | Two 8-foot pieces (Legs) |
| **Sheet Goods** | 1" Plywood | One 4x8 sheet (Top, Shelf, Brace) |
| **Sheet Goods** | 1/4" Hardboard | One 4x8 sheet (Masonite Top) |
| **Hardware** | Fasteners | GRK screws and Lag Bolts | https://amzn.to/4wA79d5
| **Hardware** | Wheels | Set of 4 Workbench Casters | https://amzn.to/4bDh1dU
| **Finishes** | Adhesives & Sealers | Wood glue, 5-minute epoxy, Polyurethane |
### 🧰 Tools Used in This Build
* Miter Saw (or Circular Saw with a straight edge) https://amzn.to/4bDh1dU
* Speed Square & Measuring Tape https://amzn.to/4fsOuds
* Drill / Driver https://amzn.to/3R6GoxS
* Orbital Sander (with 120 and 220 grit paper) https://amzn.to/3R8P7zp
* Quick Grip Clamps & C-Clamps https://amzn.to/4pdXYwz
* Stapler (optional, for the lower shelf hardboard) https://amzn.to/4grTZKp
### 📋 Video Highlights & Build Steps
1. **Cutting the Lumber:** Breaking down the 4x4 legs and 2x6 aprons.
2. **Frame Assembly:** Building the long sides first, then connecting them with the short aprons using glue and heavy-duty lag screws.
3. **Adding the Top:** Creating cleats and attaching the 1" plywood top securely to the frame.
4. **Shelf & Casters:** Fitting the lower plywood shelf and installing caster wheels for maximum shop mobility.
5. **The Hardboard Surface:** Gluing and clamping the replaceable 1/4" masonite top to the upper plywood, and stapling the lower shelf surface.
6. **Finishing Touches:** Sanding the edges and applying a protective coat of polyurethane.
If you enjoyed this build and want to see more woodworking projects, be sure to hit that subscribe button. See ya next time!
#DIYWorkbench
#Woodworking
#WorkbenchBuild
#ShopProjects
#DIY
DISCLAIMERS:
Some of these links have an affiliate code, if you purchase tools with these links I will receive a small commission at no additional cost to you. Thank you! The tools or equipment seen in this video and have been purchased ourselves.